This description takes you thru the steps needed to get your Microsoft 365 tenant ready for LoopMeeting. Please follow the steps carefully and do not skip any of the steps described unless they are marked as optional.
LoopMeeting is an Android application preinstalled on LoopMeeting android panels. LoopMeeting communicates directly to the MS365 tenant by using MS365 API’s and HTTPS interface protocol with TLS 1.2 Encryption. It Supports both the modern MSgraph and the legacy EWS API’s. You can use our pre-configured Entra-ID Enterprise application, or you can create your own application
2. Prerequisites
The LoopMeeting application needs a service account that has full rights to the resource calendars (Meeting room calendars) where you want to connect LoopMeeting panels.
Note: Make sure that your meeting rooms resource mailboxes are configured correctly.
LoopMeeting requires all of the rooms to be present in one or several roomlists.
By default rooms are not organized in any lists, so if your exchange or Office365 is not configured with roomlists, please do so. See section 5—”Create Room Lists”—for more information.
Note: If you are using MSgraph note that special characters like !#$%&’*+-/=?^_`{|}~ is not allowed in the roomlist email address. Please check this in scenarios where you have migrated from on premise Exchange server to Office 365.
2.1 Communication Protocols
For LoopMeeting to work it requires HTTPS (port 443) communication to Microsoft 365 environment and https://*.roomconfig.com.
The panels also needs to synchronize time and date with an NTP server. The Android OS is by default set to synchronize towards a Google NTP servers, so NTP (port 123) must be open towards internet to make sure time and date are correct. The panels can also be configured to synchronize with a specific NTP server.
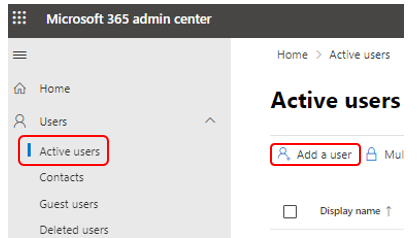
3. Create Service Account
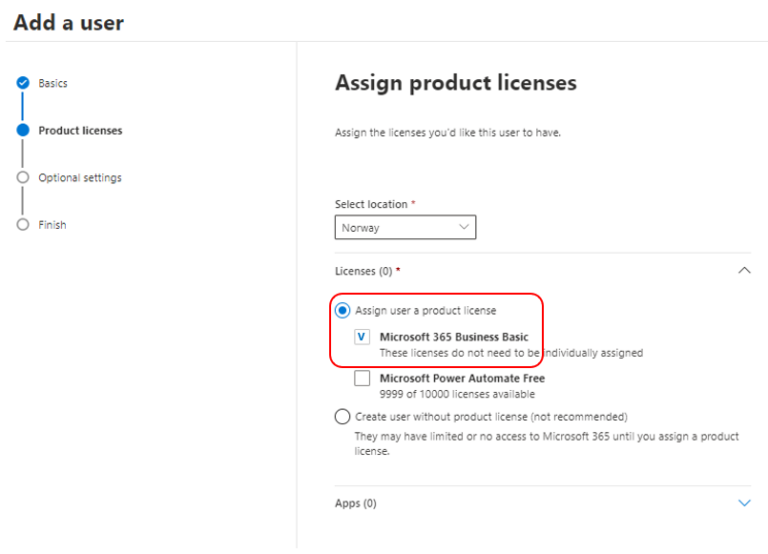
LoopMeeting require only one service account. It must have minimum an Exchange Online license (Needs to have a mailbox). NOTE!: If you are going to integrate with Teams MTR equipment the service account will need a Teams license as well. A MS365 Business Basic license is suitable for this purpose. Make sure that the service account does not require to change passwords periodically.
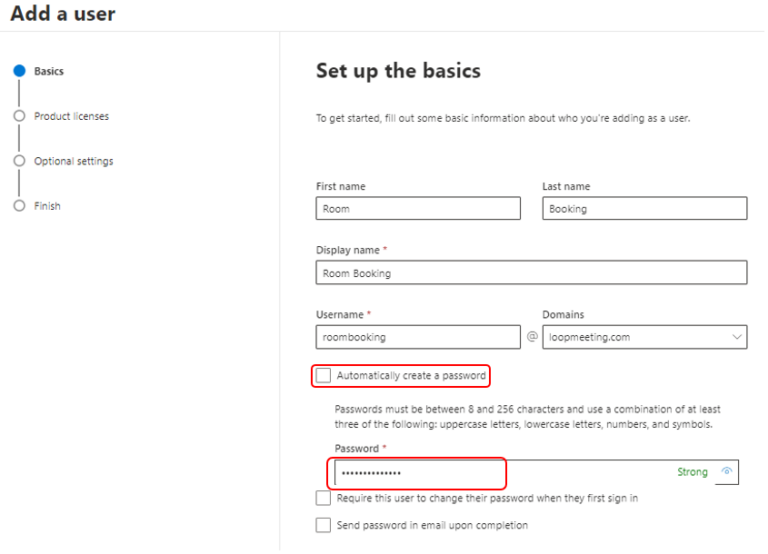
Create a new user that will be the Service account. Make sure to set the password manually and untick that the user must change the password at first logon. Click the “Next” button
The service account requires a mailbox, therefore a minimum Microsoft 365 Exchange Online license or above that contains Exchange mailbox is required.
NOTE!: If you are going to integrate with Teams MTR equipment the service account will need a Teams license. A MS365 Business Basic license is suitable for this purpose, thsi contains both Exchange Online and Teams.
Assign license and click “next” button.
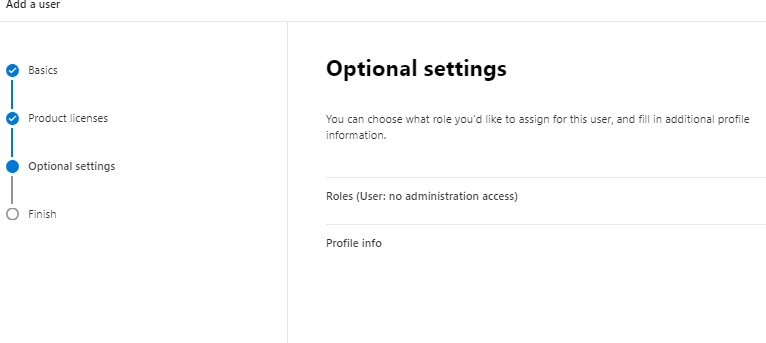
No additional settings are needed (this is a regular user)
Click “next” then “Finish”.
4. Assign service account rights to the meeting rooms
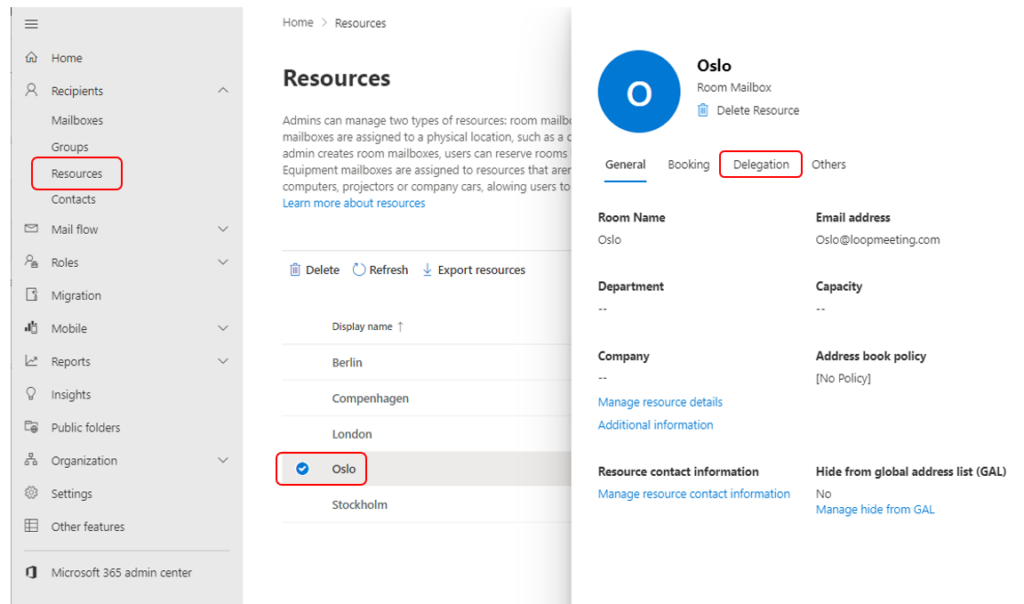
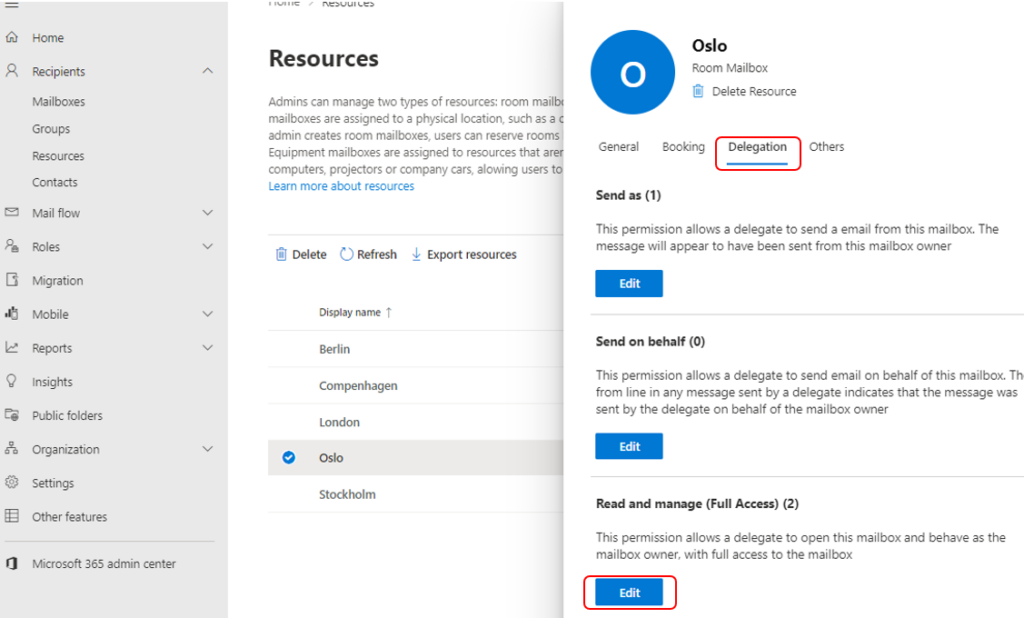
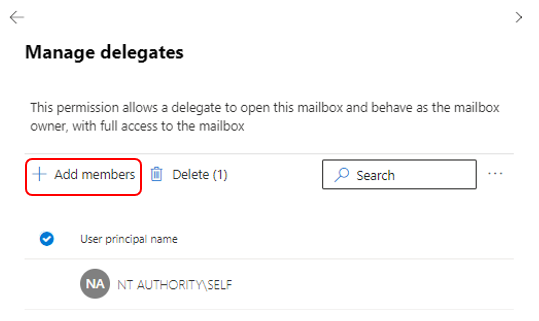
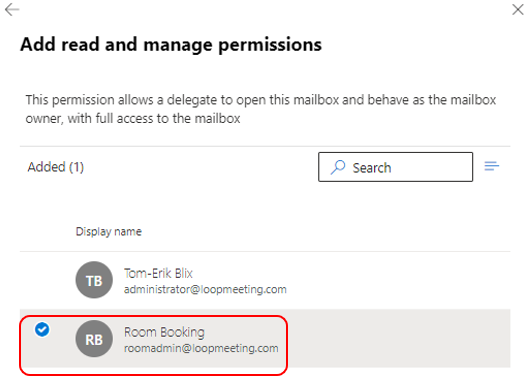
Select “Resources” in the left menu, click the resource (room) you want to add the service account and click “Manage delegates”
Add the service account created in step 3 and set rights to “full access” then press save.
Repeat these steps for all the rescources (rooms) that are to be managed by LoopMeeting panel.
5. Create Room Lists
LoopMeeting will only be able to see rooms that are a member of a roomlist. If you do not have any roomlists you will need at least one for LoopMeeting to work. If you create a new room it needs to be added to a roomlist before it can be managed by LoopMeeting.
Note: If you are using MSgraph note that special characters like !#$%&’*+-/=?^_`{|}~ is not allowed in the roomlist email address. Please check exsisting roomlists in scenarios where you have migrated from on premise Exchange to Office 365.
Please note that changes made in Microsoft 365 environment (create/change/delete – rooms and roomlists) might take up to 48 hours before they are exposed to the MSgraph API. So if your changes is not available for LoopMeeting, be patient.
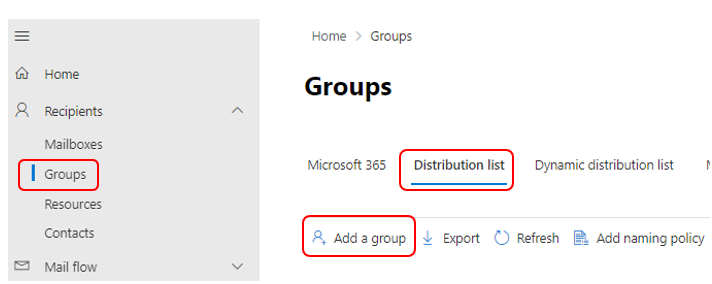
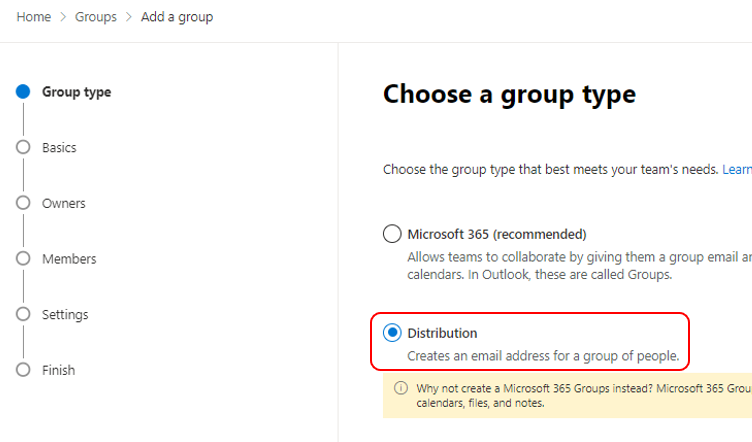
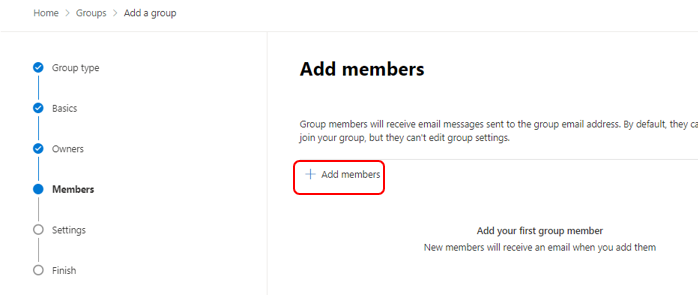
Select “Groups” in the left menu, select “Add a group” set group type to “Distribution” and click “Next”
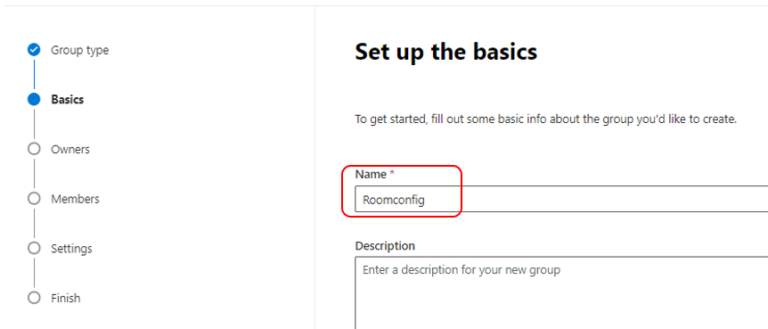
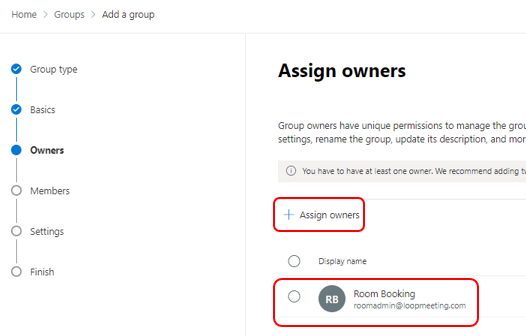
Give the roomlist a name and click “Next”, then assign a group owner.
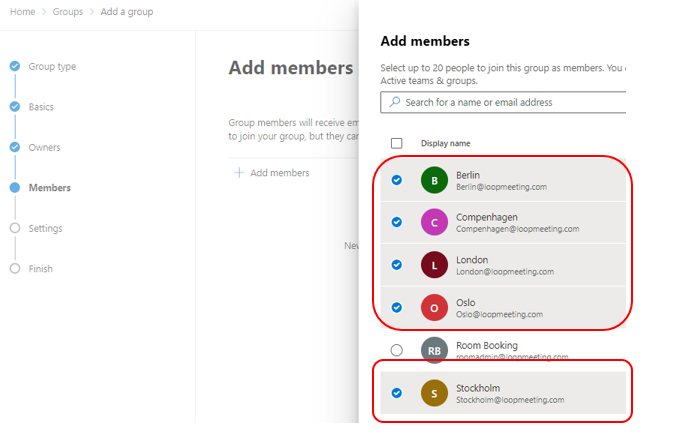
Select members to the roomlist – All the room rescources where you like to have meetingroom panels. Do not select any user accounts.
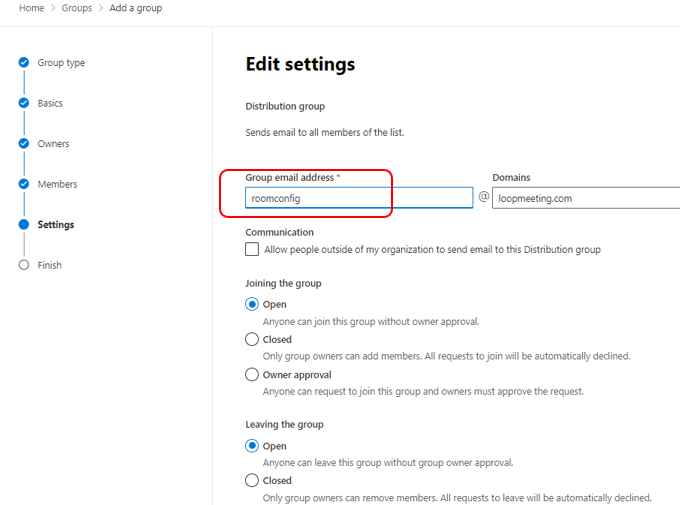
Set an email adress for the roomlist and click “next” and “Create Group”
Please note that the roomlist currently is defined as a distribution list and needs to be converted to a roomlist.
5.1 Convert distribution list to room list
The conversion is done in Microsoft 365 Powershell. If you are not familiar with powershell this task might be a bit complicated.
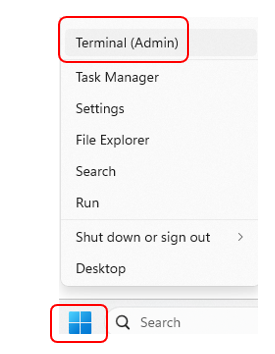
To start powershell, right click the “Windows” logo in Windows and select “Terminal Admin” or “Windows Powershell Admin” in the start menu. (Depending on what Windows version you are running) Please note that response from powershell commands may vary based on what version of powershell you are running.
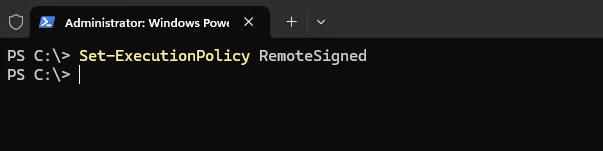
Run the following command: Set-ExecutionPolicy RemoteSigned
If asked, Accept to change the execution policy. (A)
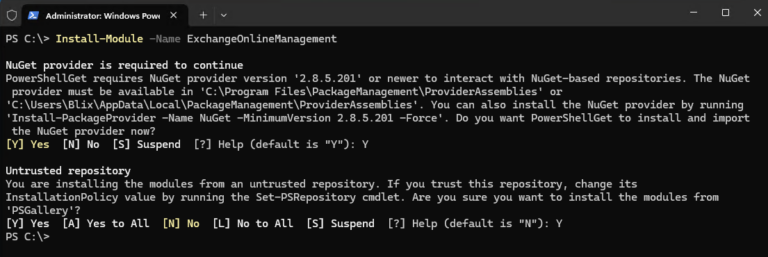
Install the needed powershell modules for managing Exchange Online Run the following command: Install-Module -Name ExchangeOnlineManagement
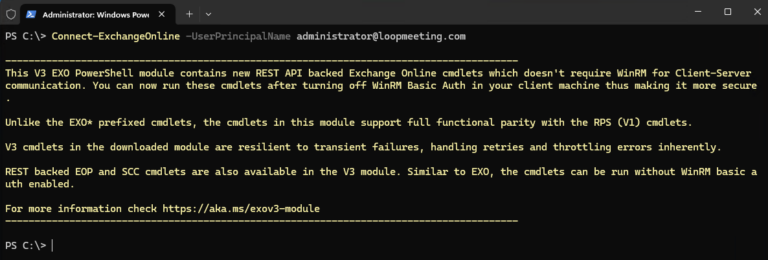
Connect Powershell to Exchange Online (Administrator user) Run the following command: Connect-ExchangeOnline -UserPrincipalName admin.name@yourdomain.com Log in with your credentials. NOTE, you must use a MS365 Global Admin account or equivalent.
Change “admin.name@yourdomain.com” to your MS365 global admin account Eaxmple: Connect-ExchangeOnline -UserPrincipalName admin@loopmeeting.com
Convert the distribution list to a room list Run the command:Set-DistributionGroup -Identity “Your Distribution List Name” -RoomList
5.2 Optionally - Add new rooms to roomlist
If you at a later stage need to add more rooms to the already created roomlist you can do so with by entering Powershell and log into your Office 365 tenant as as described in section 5.1, then run the following powershell command:
If you want to check what roomlists you have, run this powershell command: Get-DistributionGroup -ResultSize Unlimited | ` Where {$_.RecipientTypeDetails -eq “RoomList”} | ` Format-Table DisplayName,Identity,PrimarySmtpAddress –AutoSize
6. Optional – Enable show meeting subject
By default, events scheduled in the meeting room calendars will show the name of the organizer instead of the actual event title.
This is a security feature and changing this behavior should be introduced with care. If your organization would like to save subject titles of meetings in the room calendar (So it can be shown on the LoopMeeting panel) This is easily enabled through Powershell command. Please note that all subjects of meetings booked will be visible for everyone unless the meeting is set to private.
To enable subject, run this powershell command: Get-Mailbox -RecipientTypeDetails RoomMailbox | Set-CalendarProcessing -AddOrganizerToSubject $false -DeleteSubject $false -DeleteComments $false -RemovePrivateProperty $false