This description takes you thru the steps needed to create an access policy to limit the access for the LoopMeeting enterprise application. Please follow the steps carefully and do not skip any of the steps described unless they are marked as optional.
LoopMeeting is an Android application bundled with different Android based touch screen configurations. LoopMeeting communicates directly with MS365 tenant with MSgraph or EWS API’s using HTTPS interface protocol with TLS 1.2 or higher Encryption.
In order to restrict the LoopMeeting application to just a selection of your Exchange Online (MS365) resources you can optionally introduce an access policy as described below.
After applying an access policy, the LoopMeeting Application will only be able to access the resources/mailboxes that are specified in the Mail Enabled Security group. If you are not familiar with the implications access policy might have on your LoopMeeting installation, please consider if this is needed in your environment.
Note: Changes to application access policies may take more than 8 hours to take effect in Microsoft Graph API, even when Test-ApplicationAccessPolicy shows correct results.
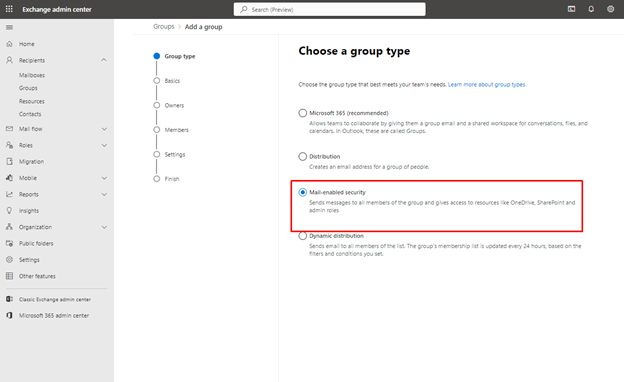
Select “Mail-Enabled Security”, then click next and enter a name. Go to the next step and add a owner of the group and enter an email address. Click next, then Create group. Make a note of the email address assigned to the group as you will need it for later step.
4. Add resources and users to the security group
After creating the group, open the group settings and click Members, then add all rooms and users that you want LoopMeeting to be able to access.
Please Note: ALL mailboxes / Rescource mailboxes that you want to be able to use with LoopMeeting must be included in the security group. Including the roomadmin account
If you at a later stage add more rooms you must remember to add them to this security group if LoopMeeting is to be able to reach them.
5. Connect to Microsoft 365 using PowerShell
Launch PowerShell as administrator and connect using modern authentication.
To start powershell, right click the Powershell application and select “Run As Administrator”
Run the following commands: Set-ExecutionPolicy RemoteSigned Accept to change the execution policy. (A)
Install-Module -Name ExchangeOnlineManagement
Connect-ExchangeOnline -UserPrincipalNameadmin.name@yourdomain.com (Replace with username for Global Admin)
6. Apply the Application Access Policy
Apply the Application Access Policy to the LoopMeeting Application using the following script.
New-ApplicationAccessPolicy -AppId 7cf2e89d-c1dd-4d03-bf84-7e9714ee95de -PolicyScopeGroupId securitygroupemail@yourdomian.com -AccessRight RestrictAccess -Description “Restrict LoopMeeting app to members of distribution group securitygroupemail@yourdomian.com”
Please note! Replace securitygroupemail@yourdomian.com with the email address from Step 1
6.1 Optionally – Test your policy
Test the newly created Application Access Policy by running this script:
Test-ApplicationAccessPolicy -Identity {enabledsecuritygroup} -AppId 7cf2e89d-c1dd-4d03-bf84-7e9714ee95de Replace {enabledsecuritygroup} with an email address that was included in the security group (For example the roomadmin user. An AccessCheckResult of Granted will be displayed.
Test-ApplicationAccessPolicy -Identity {EmailAddressNotInsecurityGroup} -AppId 7cf2e89d-c1dd-4d03-bf84-7e9714ee95de Replace { EmailAddressNotInsecurityGroup} with an email address that is not member of the security group. An AccessCheckResult of Denied will be displayed.
7. Optionally – Remove the Application Access Policy
To remove the Application Access Policy you can run this powershell command:
Remove-ApplicationAccessPolicy -Identity “596ade3a-1abe-4c5b-b7d5-a169c4b05d4a\7a774f0c-7a6f-11e0-85ad-07fb4824019b:S-1-5-21-724521725-2336880675-2689004279-1821338;8b6ce428-cca2-459a-ac50-d38bcc932258” Replace the Identity ID with the correct ID for your Access Policy.